Part two of a two-part guide to brake and clutch hydraulics on classic MGs. Part one covered fluid types, specifications, safety, identification and service life. This part covers the practical bleeding procedures for single and dual circuit braking systems, the silicone fluid debate, a useful technical tip for recalcitrant master cylinders, and the clutch hydraulic system.
System bleeding
When it comes to routine fluid changes or changing components then there will be a need to bleed all air out of the system and the traditional way will be to have the car raised on axle stands and all wheels removed, then having an assistant in the car to follow instructions from the person at the wheel cylinders when to press the brake pedal. Today many simple one man (or woman) bleeding systems are available to make the job simpler, quicker and often more effective.
The general principle of the traditional bleed process on a single circuit braking system was to carefully clean the bleed nipple on the cylinder furthest from the master cylinder, so on a right hand drive MG that would be the rear left brake cylinder, whilst a left hand drive car would be mirror image, rear right wheel cylinder. Note: It’s worth buying new bleed nipple protective caps to keep your cleaned nipple ends free of dirt.
Place the correct size of ring spanner onto the bleed nipple hexagon section then attach a length of clear plastic tube that is a tight fit over the end of the bleed nipple, (to prevent air leaks), and which is long enough to fit to the bottom of a clear jar. Add sufficient clean fresh brake fluid so the end of the tube remains covered and loosen the bleed nipple half a turn.
Ask the helper to gently press the brake pedal to the floor and tell you when the pedal is on the floor, then release the pedal and pause for a couple of seconds before gently pressing the pedal back to the floor and repeat until you observe no more air bubbles and cleaner fluid, indicating fresh fluid from the master cylinder has reached this furthest point from the master cylinder. It is critical during this process that a very regular check is made of the fluid level in the master cylinder as if the level drops too far then air will be introduced at the master cylinder and you will have to start the process all over again.
A quick aside here is that it is often the case that when actually getting to work directly on the rear drums this is often when you may notice that there is some oily dampness around the backplate that could be a brake fluid leak of the rear axle oil seals weeping. If it is the former then this means a cylinder replacement and you will need a brake hose clamp to close off the fluid flow to both rear cylinders, and I also encourage you to buy a Lockheed E clip fitting tool that turns a irritatingly annoying fit into a very simple couple of minute job. (The author has had one since attending a Special Brakes course at AP Lockheed in 1978, and whilst not used frequently when it was needed it was a god send.)
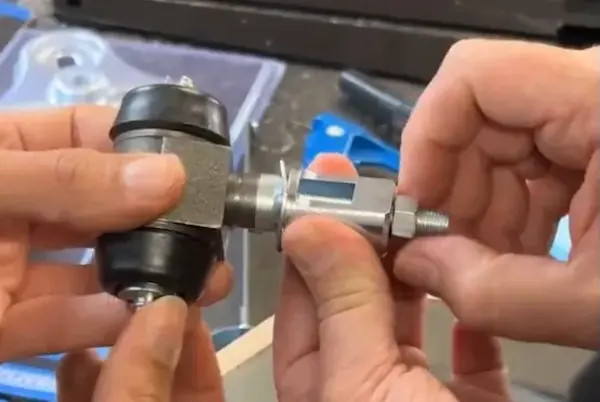
17H7949T - Wheel cylinder circlip tool in action
Back to the bleeding you now move to the next nearest wheel to the master (right rear) and repeat the bleed process that will not see as much fluid flow before clean fluid arrives. The front left and front right cylinders are then bled in the same way, (I’m describing the front calipers as cylinders).
If this process doesn’t end up with a firm pedal but one that has some sponginess then a variation on the bleed process will be to ask the helper to press the brake pedal to the floor and tell you when the pedal is on the floor. This so you can now tighten the bleed nipple before the pedal is released which will prevent fluid and any air that has just been expelled from being drawn back into the cylinder. The process is then repeated several times until no bubbles can be seen.
Indeed another slight variation that sometimes helps is to have the bleed nipple tight and ask the helper to press the pedal to create pressure in the system, and then you loosen the bleed nipple which sees a rush of fluid and the pedal straight down to the floor, when you then tighten the nipple. The fluid rush often assisting the removal of any recalcitrant air bubble stuck in the wheel cylinder.
The same bleed process is then applied to the remaining brake cylinders moving towards the master cylinder, so on that right hand drive car will be the right rear followed by the left front and lastly the right front. Now ensure each bleed nipple is dried of any residual fluid and apply normal braking pedal pressure for a couple of minutes then recheck the nipples to confirm that there is no fluid leaking.
One man bleed systems
If a one man pressure bleeding kit is available then follow the connection instructions and make sure that the cap that is used to connect the bleed system to the master cylinder is a tight and sealed fit onto the master cylinder otherwise when pressure is applied fluid leaks will occur and the glycol fluids damage paintwork! The age of our MG hydraulic systems means that the master cylinder cap diameter is smaller than modern master cylinders and why MGOC Spares sell the well-known and proven Gunson’s ‘Eezibleed’ pressure bleed kit as it has the correct size adapters.
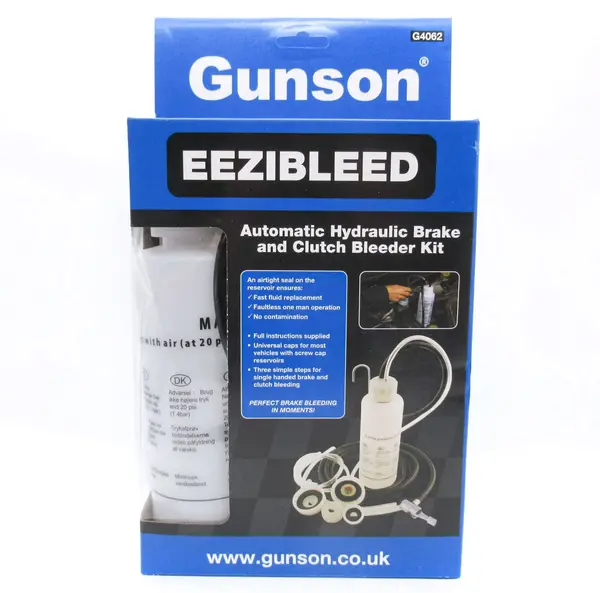
Z012 - Gunson Eezibleed Hydraulic Brake & Clutch Bleeder kit
The benefit of the one man pressure bleed system is that there is a large volume reservoir carrying new fresh fluid in sufficient volume that usually enables all four brakes to be bled with no need for a further top up, but, this doesn’t mean you shouldn’t keep a sharp eye on the level of fresh fluid in this additional reservoir!
Operating a pressure bleeder means that there is no need for an assistant to pump the brake pedal and the energy to move fluid is provided by the pressure bleeder, often the air pressure within an inflated tyre. The arrangements as described still applies at each brake cylinder, but now as soon as the bleed nipple is undone it is like opening a water tap at home and fluid flows very much faster until the nipple is tightened, but the same principle of waiting for no more air bubbles with cleaner fluid still applies. Once the first cylinder is bled then the other three are done in the same order, with I suggest a reservoir check after each when you can make a clear judgement how much fluid if used each time to avoid the big inconvenience of letting any air in and having to start again.
A variation applies to vacuum bleeders that are usually hand operated that creates suction so again eliminating the need for a helper pressing the pedal, although there are also very economic systems that use compressed air to generate the draw. Unlike the pressure bleeder there is now only the master cylinders internal fluid volume so I advise having that helper now on master cylinder fluid level watch or given the fresh container of new fluid to ensure the fluid level is kept close to the top.
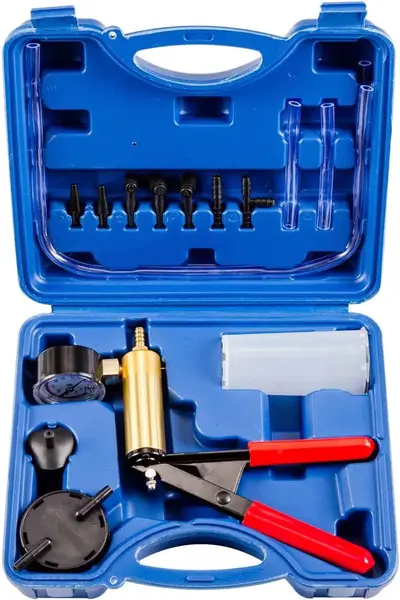 Typical hand-pump vacuum brake/clutch bleeder
Dual circuit brakes
The above caters for the single circuit braking systems for our classic MGs, but in the 1970’s the arrival of dual circuit braking systems with pressure system failure warnings complicate the scene and the methods of bleeding.
For left hand drive dual circuit 1500 Midgets with a PDWA (Pressure Differential Warning Actuator), or in simpler terms a valve between the two fluid systems with a switch that puts on a warning light if one of the hydraulic circuits suffers a leak, the bleed process is different in that now a bleed tube is fitted to both the right hand front AND the right hand rear wheel cylinders both going into their own clear jars. Next, both bleed nipples are opened about half a turn and the brake pedal is very gently depressed through no more than about half of the pedals available travels, before being repeated until both bleed tubes show no air bubbles and cleaner fluid. Now tighten both bleed nipples and repeat the operation with the two remaining cylinders.
The process is very specific in saying that the pedal pressing is very gentle and only for a small proportion of the overall available pedal travel as it is trying to not upset the PDWA valve into a system failed position which puts on the warning light, but if after bleeding the lamp is illuminating then a fiddle of repeat bleeding the right rear cylinder until the light goes out is needed, or if that fails then do the same to just the front right cylinder until the light extinguishes when the bleed nipple is tightened as the internal shuttle in the PDWA will have centralised.
If using a pressure bleed system then theoretically you need a helper so that the two bleed nipples can be opened and closed at the same time to prevent the valve shuttle being moved.
Finally dry off any residual fluid from each nipple before applying normal brake pedal pressure for a couple of minutes then rechecking to ensure there is no fluid leaking.
The MGB workshop manual has a further variation where the traditional advice of starting from the wheel cylinder furthest from the master cylinder is reversed and the factory manual guidance is now to start from the wheel cylinder that is closest to the master cylinder which on a right hand drive MGB is the front right. Firstly though the warning light switch that is screwed into the middle underside of the master cylinder is unscrewed three and a half turns and because the warning circuit that this switch operates also includes the hand brake warning light, the hand brake has to be off.
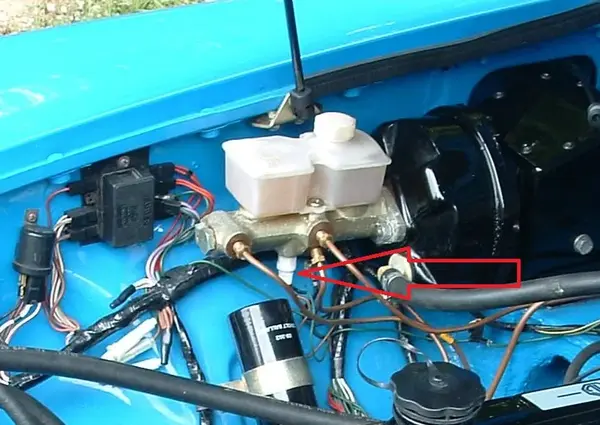 Later MGB with dual circuit, direct servo brakes, arrow pointing to the brake failure warning switch
The bleed process follows the use of the same single bleed tube and jar as previously described on the front right wheel cylinder (caliper), opening the nipple half a turn before now pressing the pedal firmly through the full pedal travel, although this will only be around half the actual travel as the second hydraulic circuit will remain operational. Allow the pedal to return on its own and pause a couple of seconds before repeating the process through the full travel until the fluid entering the jar is clear of bubbles and looks cleaner, then have the assistant hold the pedal down whilst you tighten that bleed nipple. Now move to the other front caliper and repeat before moving to the rear wheel cylinders and repeating there. Note that there is no priority to which rear cylinder is done first.
Pressure bleeding follows the same process as for the single circuit bleeding, but with the vacuum bleed process you now need to remember that inside the obviously much larger master cylinder reservoir is split into two, one part for each hydraulic circuit, so you have to be just as observant on maintaining the fluid level as with the single circuit systems.
Finally dry off any residual fluid from each nipple before applying normal brake pedal pressure for a couple of minutes then rechecking to ensure there is no fluid leaking.
Silicone fluid
A significant number of owners have wanted to take advantage of some of the different characteristics of Silicone brake fluid (DOT 5). Primarily this will be the non-hygroscopic (not absorbing atmospheric water) nature of silicone fluid, so reduced frequency of routine fluid changes, and the non-damaging of the cars paint. However all is not a bed of roses as some of the other characteristics of silicone fluid have negative effects, such as the lower lubricity and fluids greater compressibility, the former being the cause of many instances of brakes hanging on or not releasing.
AP Lockheed the manufacturer of brake and clutch systems for many of our MGs has never recommended using silicone fluids with their products and following many customer complaints made this clear in the release of this statement that was published in many of their annual brake component catalogues during the 1990’s that still applies today.
PDF — Page copied from the front of a 1990s Lockheed brake catalogue, silicone fluid warning
The author has experienced severe brake hanging on issues with an MG Specialists then new MGB demonstrator in 1991 with 100% brand new AP Lockheed MGB spec braking system using silicone fluid and he can attest to the very significant degree of safety degradation this issue can cause. This car had the silicone fluid flushed out and replaced with normal DOT 4 fluid and full normal braking function was immediately achieved.
The basic issue is that the Lockheed components were designed to operate in tandem with the properties of their DOT3 fluid as part of the normal operating window, but with production tolerance some of those components were not able to operate as designed with the changed characteristics of silicone fluid.
To provide a balance the author has also experienced normal operation of MGBs braking with silicone fluid, so has experienced both side of the fence, but knows the reported issues are genuine and not one driven by a manufacturer acting just on self-centred commercial considerations, as has been suggested.
See MGOC Spares range of brake fluids here.
Classic MG hydraulic systems technical tip
This tip has been circulated several times over the last twenty years and I repeat it again here as there continues to be a regular flow of similar queries from MGOC members suffering this problem and the number confirming they were able to solve it by following the suggestions could save other members considerable grief, time and expense.
An interesting condition has been noted since the early 2000’s relating to the bleeding and operational efficiency of brake or clutch hydraulic systems on classic MGs. This is usually noted when work is being done on the braking or clutch systems when the master cylinder has been drained and in some cases when a new master cylinder has been fitted.
The problem is that when it is time to bleed the system it is found that pumping via the pedal it is difficult or in some cases impossible to get a good fluid flow. Many then pressure bleed and evacuate all air from the lines and cylinders, yet afterwards there is still a long first pedal. A second repeat rapid pump of the pedal usually generates a firm and higher pedal and a common assumption is that there is air in the system, which may not be the case.
This condition is often pointing at poor sealing within the master cylinder between the piston main seal and the cylinder bore wall, leading to some fluid being able to pass the seal lip and remain in the master cylinder when the pedal is pressed. This means there is less fluid being pushed towards the wheel cylinders or clutch slave leading to a longer pedal before proper function is seen. Interestingly this is more common when the master cylinder is drained during work to the rest of the system, indicating that there may be slight distortion of the seals occurring when the seal is coming in contact with air. This is a far less common problem with brand new master cylinders, but they are not totally immune from the same issue and this probably relates to the EPDM that the seals are made from that is specifically made to work with glycol ester fluids, but do seem to require more pumping cycles to fully bed in.
The frequency and long term nature of this issue has generated considerable feedback and a couple of suggestions is confirmed by many owners to have a reasonably high degree of success in curing the problem. One route is to simply rapidly pump the affected brake or clutch, not bleeding, just pumping the pedal for as long as your legs can stand it, then repeat over the next few hours or days if needed. MGOC member feedback indicates between 300 and 500 pumps is the common zone when pedal normality returns with a good first pedal response, but if after 500 pumps there is no improvement then that is time to think about replacing the master cylinder or its seals.
One easier method for brake systems is to pump up the footbrake and hold pressure on by then placing a piece of wood between brake pedal and seat frame and leave overnight. This is unlikely to be effective for clutch systems as the generated fluid pressures are much less in clutch systems and it is likely that fluid will be able to weep past the master cylinders main seal because the seal is not as tight as is needed against the master cylinders bore wall.
Clutch system bleeding
Whilst the brakes are by far the most important aspect to get right the clutch operation is one that can equally cause significant headaches when not working properly. The general operating principles and bleed process is the same as brakes although obviously there is just a single slave cylinder rather than multiple wheel cylinders. Peak fluid pressures are also much lower than in the braking system.
Bleeding the clutch follows the previously described operation for single circuit brakes and that includes the use of pressure and vacuum bleeding systems.
With the clutch on MGAs, MGBs, MGCs, V8 and Midget the slave cylinder is a similar design item and it is possible (with non-standard replacement hoses) that the connection of the fluid feed hose from the master cylinder and the bleed nipple positions can be reversed. This puts the bleed nipple at a lower position to the fluid feed and whilst with pressure and compressed air vacuum bleeding it may well be possible to purge all air from the slave cylinder, with lower energy bleeding such as clutch pedal operation it is very unlikely that all air will be removed and the resulting pedal and clutch operation will not be as good as it should be, or not work at all.
The simple principle is that the bleed nipple must always be at the highest point on the slave cylinder so that air is always going to be expelled when the bleed nipple is opened and fluid flows. Some manufacturers of replacement Lockheed cylinders for convenience and packaging reasons place the bleed nipple in the wrong position for MGs.
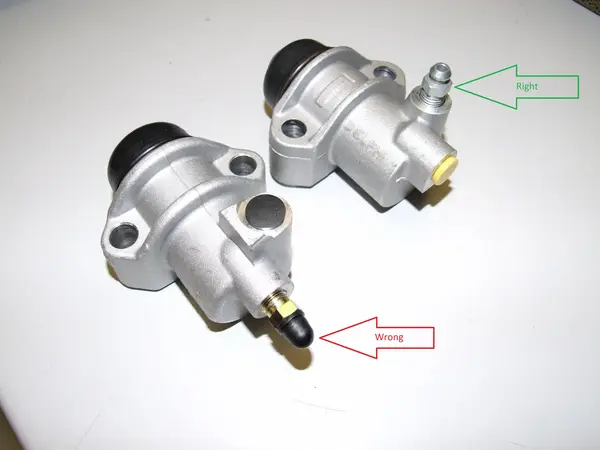 MGA, MGB, V8 and Midget type clutch slave cylinders showing right (green arrow) and wrong (red arrow) bleed nipple fitting positions.
Even with the bleed nipple in the correct position it can still be difficult to get all air out of the slave cylinder and here there are a couple of moves that can help. One is to reverse bleed where you use a syringe full of fresh fluid and introduce this through the loosened bleed nipple of the slave so pushing the fresh fluid back towards the master cylinder. However you must be careful to remove a quantity of fluid from the master cylinder reservoir first otherwise you run the real risk of seeing fluid overflow from the master and ruin paintwork as previously highlighted.
The other option is to remove the slave cylinder, as in most applications it is a simple job, and use a blunt ended rod to push the slave piston fully back, (blunt so you don’t damage the outer seal), then hold the cylinder in a position that ensures that the bleed nipple is clearly at the highest point, then hold it there whilst you attempt a manual bleed with a helper pushing the pedal on your commands.
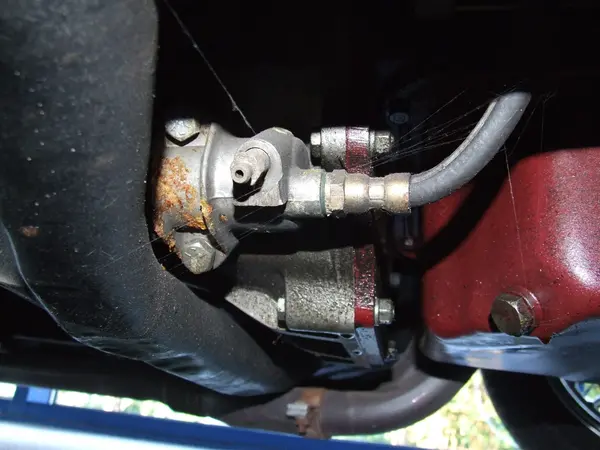 Clutch slave on MGA showing typical mounting position of the bleed nipple (the same on all other applications using the B series engine) where the angle is not perfect for expelling all air.
This was Part 2 of a two-part guide. Part 1 covers the chemistry, specifications and safe handling of classic MG brake and clutch fluid — essential reading before choosing fluid or starting any servicing work.
See our full range of classic car components here. For further information contact our helpful sales advisors by phone on +44 (0)1954 230 928 or email at sales@mgocspares.co.uk.
Please Note: The information provided in this blog is intended as a general guide only. While we aim to ensure accuracy, classic vehicles can vary, and procedures may differ depending on model and condition. Always consult your vehicle’s official workshop manual before carrying out any work. If in doubt, seek the services of a qualified professional.
© 2025 MGOC Spares Ltd. All rights reserved.
This blog and its contents are the intellectual property of MGOC Spares Ltd and may not be copied, reproduced, or republished without prior written permission.
For author enquiries, corrections, or reproduction requests, please contact: blog@mgocspares.co.uk
Meet Roger Parker – our MG “Tech Guru” with a lifetime of passion for all things MG!
From his early experiences with MGs, to a career as a traffic officer developing ANPR systems, advising MG Rover and then as a technical advisor & writer at the MG Owners’ Club – Roger has worked on hundreds of MGs. Now, in “retirement,” he shares his unrivalled knowledge with us at MGOC Spares.
His blogs (exclusive & free!) are packed with expertise you won’t find anywhere else.
View more here
Who are MGOC Spares?
At MGOC Spares, we provide dedicated parts and accessories for classic MG vehicles, including the MGB, Midget, MGC and many more.
With thousands of products in stock, we are your one-stop shop for all your classic car needs. Our wealth of expertise means that you can trust us to find the right part for your classic MG vehicle – whatever it may be.
Need support finding the right parts for your MG?