Classic MG electrical systems are simple, and this reflects the time in which they were made. For example, an MGB originally had just two fuses, but by the end of production eighteen years later it had six — reflecting not only increased complexity within the electrical system, but also changing attitudes towards electrical safety and efficiency. By comparison, a late MG TF has thirty-five, and some models a couple more.
How much current do MGB headlamps actually draw?
That early-car simplicity was adequate for the time the car was built, but it wasn't the best, and improvements can be made — not just to the fusing arrangements, which can be somewhat complex to upgrade significantly, but to the operation of some of the car's higher-load electrical items. The first obvious items to look at are the headlamps, as when needed they are on for long, continuous periods and have a reasonably high draw. Take the dipped beam headlamp, which often has a 55 watt bulb filament that will be drawing 4.58 amps; there are obviously two lamps, so that is 9.16 amps being drawn. Switch to main beam and the usual 60 watt bulb filament will see the draw rise to 10 amps; however, some older sealed beam headlamp main beam filaments were 75 watt, which raises the draw to 12.5 amps.
Dip switch and lighting switch failure: the warning signs
In standard form that draw is first switched through the main lighting switch, which is also supplying the side lamp circuit bulbs that will be another 4.5 amps, before it reaches the dip switch, which directs the power to the dip or main beam filaments at the command of the driver. All that power going through those two switches often creates a little warmth in them, and as they age and get a little dirty, so resistances build up and slight warmth can become quite hot.
As a result, it is not unknown for the steering column type dip switches to generate enough heat to soften the plastic, so that the connecting terminals within the switch start to sink into it and connection is lost, demanding a new stalk switch. This is usually confined to just the dip circuit, as this is the one that is on for the most time. Earlier floor mounted, foot operated dip switches are not immune and have their own problems, but a common factor between all switches is that terminal degradation is amplified by the high current flow.
Why classic MG headlights get dimmer with age
Another negative aspect that comes with the degrading terminals is that the energy needed to overcome resistance within the terminals reduces the voltage seen at the lamps, and this reduces their output too, so you have a less bright lamp. This is where the headlamp relay conversion from MGOC Spares comes in, offering a neat and complete conversion that uses separate relays — one for dipped beam and one for main beam — providing the route to several improvements. (MGB Headlamp Relay Kit) MGB Headlamp Relay Kit
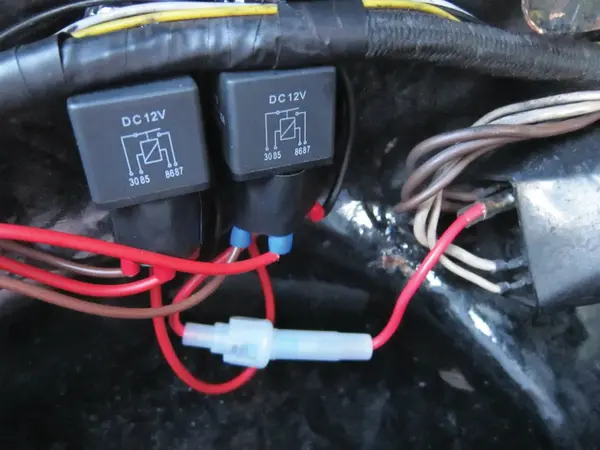 M104D - MGOC Spares headlamp relay kit relays fitted on a car.
What an MGB headlamp relay kit changes
A relay is simply a heavy duty electrical switch, designed to carry much heavier electrical loads than either the main lighting or the dip switches. Nominally, a common load capacity for a relay will be 30 amps, which can immediately be seen to be on average three times the capacity needed for headlamp operation. The relay also gets its power from a new and separately fused direct battery power source, so there will be far fewer connections and reduced potential for voltage drops.
A secondary benefit is that the car's original lighting switch, which was previously carrying up to 15 amps (side lamp and headlamp loads), is now carrying just the side lamp 5 amps plus a very small load (nominally 200 milliamps) that is just enough to operate the new relay coil. Meanwhile, the load that the dip switch is now carrying is just the relay switching load, and this means that both switches have a much easier life and should last noticeably longer.
A third and probably the most obvious benefit is that eliminating several high load connections and replacing them with one more efficient connection usually reduces the voltage drop that the standard system sees; that means a higher voltage reaches the headlamps, which results in a brighter light. You do, though, need to ensure that the car's original black earth wiring from the lamp to the common earthing point is clean, tight and not creating its own resistances.
Driving or spot lamps
In the 1960s it was quite common to see a pair of additional spot or driving lamps fitted to the front of an MGB, and for the same reasons that a relay is beneficial for the headlamps, the same applies to any additional lamps too. The same general principles apply in terms of fitting the relay, but the wiring usually requires that these extra lamps are operated on the main beam circuit, so that they automatically extinguish when the headlamps are switched back onto dipped beam — as only a pair of dipped beam lamps are permitted to be on (side lamps excepted), to avoid dazzling other drivers. MGOC Spares can provide a relay for a pair of additional lamps.
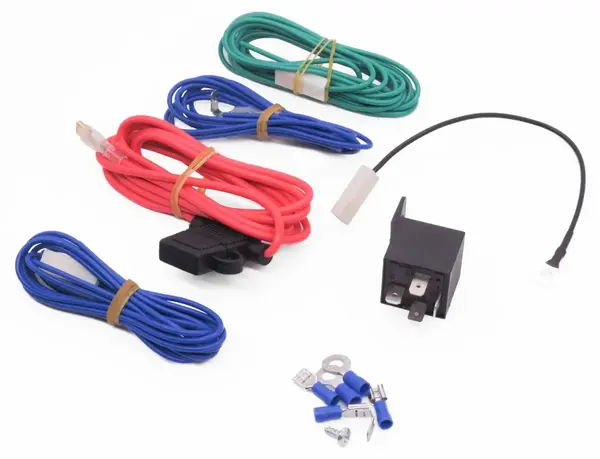 M104E - MGOC Spares single relay for additional spot or driving lamps
Adding a relay to the 1977 to 1980 MGB electric cooling fan
Having discussed the benefit of adding a relay to the headlamps of a standard classic MG, where else can a standard car's electrics benefit from a relay? The late MGB that saw the addition of an electric cooling fan is the obvious candidate, as oddly the four cylinder cars didn't have a dedicated fan relay — even in twin fan format, which was a mirror image of the MGB GT V8's twin electric fans, and the V8s did have an individual relay!
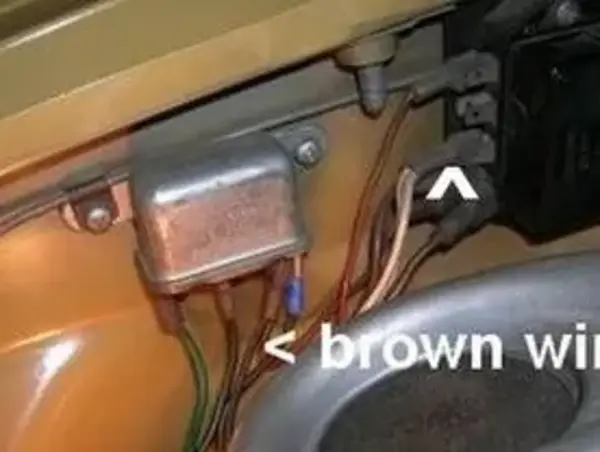 MGB GT V8 standard cooling fan relay.
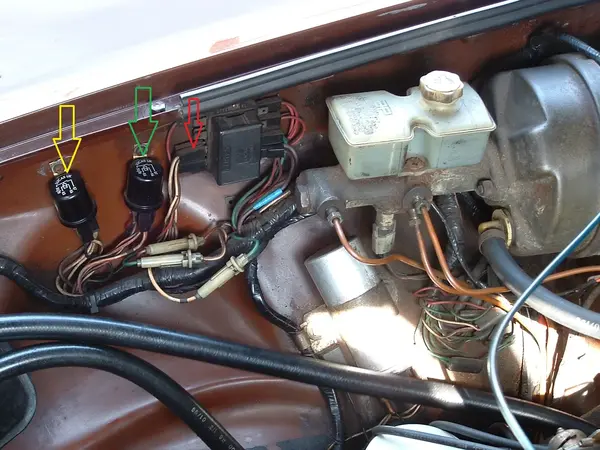 Post 1976 MGB standard ignition relay (green arrow), starter relay (yellow arrow) and ignition relay white/brown output wire (red arrow)
There was the all-encompassing standard ignition system relay (Image above), though — but all the other ignition circuit electrical loads it carries, plus the fact that it is known to fail very much earlier than the starter relay that resides right next to it, do offer a reason to add a separate relay with its own fused power supply just for the cooling fan. Another benefit, just like the headlamp circuit, is that the fan control switch in the top of the radiator in standard form has to carry all the electrical load, which is similar to that of a single headlamp; so adding a relay that takes all the electrical load is a very sound modification to consider.
The LED alternative: brighter lamps, lower current draw
Everything above assumes you are working with the filament lamps the car was designed around, and for most owners the relay conversion is the right first step because it fixes the cause rather than compensating for it. There is, though, a second route now available that changes the arithmetic considerably. The Stella Lux H4 LED conversion from Q Parts (QP472C) replaces the H4 bulb itself with a plug-and-play fit and is compliant with current UK MOT requirements on vehicles first used before 1 April 1986.
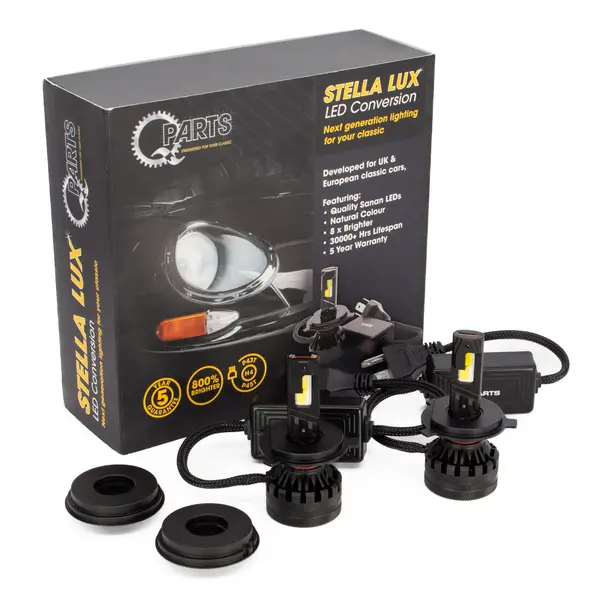 QP472C - STELLA LUX H4 LED Bulb Conversion for H4 Lamps
The relevance to everything discussed above is current draw. An LED conversion pulls a fraction of what a 55 or 60 watt filament demands, which means the load passing through your lighting and dip switches falls away almost entirely — the switch-cooking problem largely solves itself. That does not make the relay kit redundant: the voltage drop across aged terminals and tired earth connections still exists, and a relay conversion combined with an LED upgrade gives you both a clean supply and a lamp that makes the most of it. What it does mean is that an owner who has already burnt out one dip switch has two workable ways forward, and can choose based on whether period-correct appearance matters more than outright output.
One fitment point matters here and is worth stating plainly: the H4 conversion suits 7" H4 headlamps only. It cannot be fitted to sealed beam units, where the light source is not replaceable. Owners still running sealed beams — and that includes many earlier cars, as noted at the start of this article — will need an H4 conversion first.
Fitting an H4 conversion is a straightforward job, and the units supplied by MGOC Spares are pre-assembled and E-marked, dropping into the original headlamp bowls without modification. The Q Parts sets are supplied in pairs, complete with 60/55 watt H4 bulbs and rubber weatherproof boots, and are designed to preserve the original appearance while giving roughly three times the output of the sealed beam unit they replace.
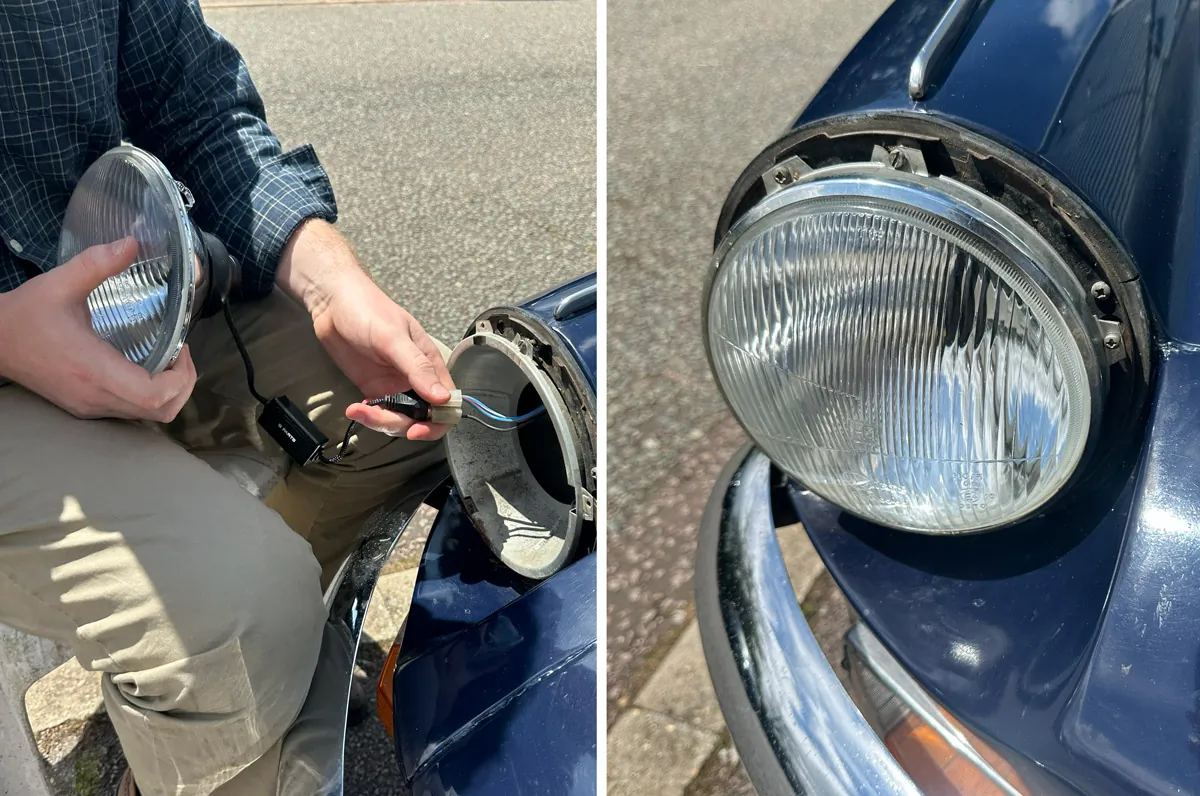 Pete fitting our Stella Lux H4 LED Conversion to his Triumph Spitfire MKIII
Chrome-bumper owners want M200, the H4 convex lens set for right-hand drive, the convex lens focusing the beam further on main and giving a crisper dip-beam cut-off than the original flat glass. Rubber-bumper cars take M205, the flat lens set for right-hand drive, which additionally includes the pilot light wiring harnesses, pilot bulbs and original-style weatherproof boots that those cars require. Left-hand drive owners are catered for separately, and it is worth ringing the parts desk rather than guessing, as dip pattern is not something to get wrong.
Once an H4 unit is in place, the car is then a candidate for the Stella Lux LED conversion described above, should you want to go further — and, of course, for the relay kit that is the subject of this article. Taken together, an H4 conversion, a relay kit and a clean earth will transform the night-time driving experience of a car that has spent forty years making do with what Abingdon fitted!
See our full range of MGB parts here. For further information contact our helpful sales advisors by phone on +44 (0)1954 230 928 or email at sales@mgocspares.co.uk.
Please Note: The information provided in this blog is intended as a general guide only. While we aim to ensure accuracy, classic vehicles can vary, and procedures may differ depending on model and condition. Always consult your vehicle’s official workshop manual before carrying out any work. If in doubt, seek the services of a qualified professional.
© 2025 MGOC Spares Ltd. All rights reserved.
This blog and its contents are the intellectual property of MGOC Spares Ltd and may not be copied, reproduced, or republished without prior written permission.
For author enquiries, corrections, or reproduction requests, please contact: blog@mgocspares.co.uk
Meet Roger Parker – our MG “Tech Guru” with a lifetime of passion for all things MG!
From his early experiences with MGs, to a career as a traffic officer developing ANPR systems, advising MG Rover and then as a technical advisor & writer at the MG Owners’ Club – Roger has worked on hundreds of MGs. Now, in “retirement,” he shares his unrivalled knowledge with us at MGOC Spares.
His blogs (exclusive & free!) are packed with expertise you won’t find anywhere else.
View more here
Who are MGOC Spares?
At MGOC Spares, we provide dedicated parts and accessories for classic MG vehicles, including the MGB, Midget, MGC and many more.
With thousands of products in stock, we are your one-stop shop for all your classic car needs. Our wealth of expertise means that you can trust us to find the right part for your classic MG vehicle – whatever it may be.
Need support finding the right parts for your MG?